Getting Started
This chapter goes into greater detail about the installation of both the Panl and Solr Servers, how to start the servers, index data in the Solr server instance, and run the Example Panl Results Viewer Web Application.
|
|
Notes: If you have already got everything up and running from the Quick Start - The 5 Steps section, then you can skip this section with relative safety as it expands on the previous section by going into finer-grained detail with deeper explanations.
If something is not working, see the When Something Goes Wrong section. |

For this book we are going to be looking at a faceted search engine based on mechanical pencils - in particular 2mm clutch type mechanical pencils.[16] The data used is included with the Panl release package and offers a good learning opportunity to understand
- How to set up a Solr search server,
- How to index data,
- How to configure and run a Panl server, and
- What features are available through configuring the Panl server.
|
|
IMPORTANT: This is the Getting Started guide for Solr version 9, if you are using a previous version of Panl, ensure that you have the correct Panl release package and the you refer to the Setting up a Solr 7 or 8 server section in the Appendix for how to index data for those versions. |

Downloading the Resources
Apart from a Java version 11 or greater, you will need the following resources:
- Download the latest release of Synapticloop Panl - this book is using the solr-panl-9-2.2.0 version:
https://github.com/synapticloop/panl/releases/ - Download the latest version of Apache Solr - this book is using the 9.10.0-slim version:
https://solr.apache.org/downloads.html
Now unzip/untar/untgz the resources into an installation directory. For the installation in this book, the following paths were used:
The Solr server
On a Windows machine the installation directory was:
C:\java-servers\solr-9.10.0-slim\
whilst on a *NIX[17] the installation directory was:
/Users/synapticloop/java-servers/solr-9.10.0-slim/
Whichever operating system that you are using, throughout this book, this directory is referred to as the SOLR_INSTALL_DIRECTORY.
The Panl server
On a Windows machine the installation directory was:
C:\java-servers\solr-panl-9-2.2.0\
whilst on a *NIX the installation directory was:
/Users/synapticloop/java-servers/solr-panl-9-2.2.0/
Whichever operating system that you are using, throughout this book, this directory is referred to as the PANL_INSTALL_DIRECTORY.
A Note On Running The Commands
Whilst the functionality of Solr between the versions does not impact the setting up and running of Panl. The command line tools which are used in this section have changed since the start of writing this book, and may change again with any new versions of Solr that are released.
The commands have been tested against the latest version as at writing, with some notes for previous versions.
Latest Version Panl 2.2.0 and Solr 9.10.0
All commands listed are for the latest version at time of writing this book, there are some differences for other versions, see below for more details.
Previous Solr 9.*.* Versions Command Line Changes
The command line options passed through have changed depending on the version that you are using, some noted changes are:
Version 9.7.* and below
If you are using Solr version of 9.7.0 or earlier, then you will need to replace the command line parameter of
--shards
To
-s
Version 9.6.* and below
Including the change above, you will also need to change
--no-prompt
To
-noprompt
Any Version
To determine command line options for your installed version of Solr, you can run the command:
*Windows
|
Command(s) |
|
cd SOLR_INSTALL_DIRECTORY
bin\solr.cmd <command> -help |
*NIX
|
Command(s) |
|
cd SOLR_INSTALL_DIRECTORY
bin/solr <command> -help |
Where <command> is the Solr command that you require more information for, or you could peruse the Solr Versions Command Line Options below for your specific version.
Also, use the Solr reference documentation (the 'Exercise 0: Five Minutes to Searching!' quick start sections are quite useful).
The latest version:
https://solr.apache.org/guide/solr/latest/index.html
And the tutorial
https://solr.apache.org/guide/solr/latest/getting-started/solr-tutorial.html
The 'latest' version should match the 9.10.0 version that this book references, however, the inevitable marching on of time may see new releases, so the Solr 9.10.* URLs are below
https://solr.apache.org/guide/solr/9_10/index.html
And the tutorial
https://solr.apache.org/guide/solr/9_10/getting-started/solr-tutorial.html
Solr 8.11
https://solr.apache.org/guide/8_11/
And the tutorial
https://solr.apache.org/guide/8_11/solr-tutorial.html
Solr 7.7
https://solr.apache.org/guide/7_7/
And the tutorial
https://solr.apache.org/guide/7_7/solr-tutorial.html
Solr Versions Command Line Options[18]
As the Solr server versions change, the command line options may also change. Below is a table of command line options which need to be replaced if you are not using Solr version referenced in this book (i.e. Solr 9.10.0).
|
Solr Version |
Solr Command |
Solr Command Line Parameters |
||||
|
Solr Version 9 |
||||||
|
9.10.0 9.9.0 9.8.1 9.8.0 |
start |
-e cloud --no-prompt |
||||
|
create |
--shards 2 -rf 2
Or
-sh 2 -rf 2 |
|||||
|
9.7.0 |
start |
-e cloud --no-prompt |
||||
|
create |
-s 2 -rf 2 |
|||||
|
9.6.1 9.6.0 9.5.0 9.4.1 9.4.0 9.3.0 |
start |
-e cloud -noprompt |
||||
|
create |
-s 2 -rf 2 |
|||||
|
Solr Version 8 |
||||||
|
8.11.4 |
start |
-e cloud -noprompt |
||||
|
create |
-s 2 -rf 2 |
|||||
|
Note: The above commands should work for all Solr versions 8.*.* (but are untested)
Solr Version 7 |
||||||
|
7.7.3 |
start |
-e cloud -noprompt |
||||
|
create |
-s 2 -rf 2 |
|||||
|
Note: The above commands should work for all Solr versions 7.*.* (but are untested) |
||||||
If you are receiving an unexpected error, try running the help command for the Solr server and operating system that you are using which will list the command line options that are available
Windows:
|
Command(s) |
|
cd SOLR_INSTALL_DIRECTORY
bin\solr.cmd start -help |
*NIX:
|
Command(s) |
|
cd SOLR_INSTALL_DIRECTORY
bin/solr start -help |
Creating and Starting a Solr Cloud Instance
Run the following command which will start up Solr in cloud mode with default values i.e. two replicas and two shards per replica, with a default collection of 'gettingstarted'
Windows:
|
Command(s) |
|
cd SOLR_INSTALL_DIRECTORY
bin\solr.cmd start -e cloud --no-prompt |
For example, the above command with the Windows installation directory replacement would translate to:
cd C:\java-servers\solr-9.10.0-slim\
bin\solr.cmd start -e cloud --no-prompt
*NIX:
|
Command(s) |
|
cd SOLR_INSTALL_DIRECTORY
bin/solr start -e cloud --no-prompt |
For example, the above command with the *NIX directory replacement would translate to:
cd /Users/synapticloop/java-servers/solr-9.10.0-slim
bin/solr start -e cloud --no-prompt
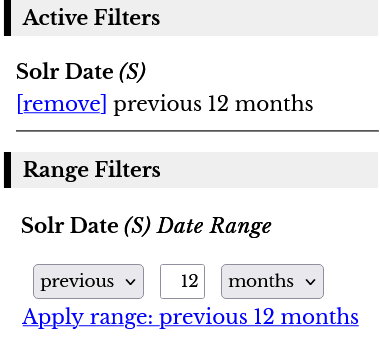
This will start Solr in cloud mode with the defaults - you can check to see that it is up and running by going to the cloud admin console:
http://localhost:8983/solr/#/~cloud,
and you should be presented with a page similar to the following:
Image: The Solr Cloud Admin page
|
|
Notes: In the above image, under the 'Collections' column in the table, you will see the value 'gettingstarted' - this is the default collection that is set up and can be safely ignored. |
The above shows the two cloud Solr nodes up and running - ignore the values for the moment - now it is time to create the mechanical pencil collection and index the data.
|
|
Notes: The Solr admin pages off a lot of information for troubleshooting collections and indexes. It is worth your while getting to understand the functionality behind it, however, a deep understanding of it is beyond the scope of this book. |
Creating a Collection
To create a collection, we will be using the schema and data included in the Panl server release package, which resides in the directory:
PANL_INSTALL_DIRECTORY/sample/solr/mechanical-pencils/
Run the following commands to create a new collection named mechanical-pencils
Windows:
|
Command(s) |
|
cd SOLR_INSTALL_DIRECTORY
bin\solr.cmd create -c mechanical-pencils -d ↩ |
*NIX:
|
Command(s) |
|
cd SOLR_INSTALL_DIRECTORY
bin/solr create -c mechanical-pencils ↩ |
This will create a collection called mechanical-pencils. You can confirm the creation of the new collection on the cloud admin console:
http://localhost:8983/solr/#/~cloud
and you will be presented with a page similar to the following:
Image: The Solr Cloud Admin page
|
|
Notes: In the above image, two collections are now shown, 'gettingstarted' and 'mechanical-pencils', you can safely ignore the 'gettingstarted' collection. |
Indexing the Data
Now that the collection has been created, it is time to index the data. Data for the mechanical-pencils collection is included in the Panl Server package in the PANL_INSTALL_DIRECTORY/sample/data/ directory.
To index the data:
Windows:
|
Command(s) |
|
cd SOLR_INSTALL_DIRECTORY
bin\solr.cmd post -c mechanical-pencils ↩ |
*NIX:
|
Command(s) |
|
cd SOLR_INSTALL_DIRECTORY
bin/solr post -c mechanical-pencils ↩ PANL_INSTALL_DIRECTORY/sample/data/mechanical-pencils.json |
At this point, the Solr server has been started, the dataset has been indexed, and you are at the point where the Panl server can now be started.
Starting The Panl Server
Windows:
|
Command(s) |
|
cd PANL_INSTALL_DIRECTORY
bin\panl.bat server -properties ↩ |
*NIX:
|
Command(s) |
|
cd PANL_INSTALL_DIRECTORY
bin/panl server -properties ↩ |
http://localhost:8181/panl-results-viewer/
You will be presented with the following page:
Image: The In-Built Panl Results Viewer web app showing the list of available collection/FieldSet configurations

Select one of the collection/FieldSet URLs - for example
http://localhost:8181/panl-results-viewer/mechanical-pencils/firstfive
and start searching, sorting, faceting and sorting.
When Something Goes Wrong
|
|
Tips: Ensure that you have the latest version of this book and Panl and Solr servers (if you are able to). Whilst the commands shouldn't change, they might... |
Alas, not everything always goes according to plan, when attempting to troubleshoot the instructions, the base advice is to check the logs and attempt to understand what the logging tells you, and if all else fails, start with a separate, clean Solr installation (as opposed to using an existing Solr installation) so that there are no errant configuration problems.
This will ensure that:
- All default ports are available for both the Solr (ports 8983, 7574, 9983) and Panl (port 8181) servers - which are referenced throughout this book, and
- No conflicting configuration is used from previous installations
Checking the Logs
The Solr web app has an in-built administration console which contains logging. Whilst it can be confusing, it can give some hints as to what is happening and if there are any errors.
The Solr administration console can be viewed at:
http://localhost:8983/solr/#/~logging
Image: The Solr Cloud Admin's logging page
Deleting a Collection
To delete a collection, the Solr server must also be restarted.
Windows:
|
Command(s) |
|
cd SOLR_INSTALL_DIRECTORY
bin\solr.cmd delete -c mechanical-pencils bin\solr.cmd restart -port 8983 bin\solr.cmd restart -port 7574 |
*NIX:
|
Command(s) |
|
cd SOLR_INSTALL_DIRECTORY
bin/solr delete -c mechanical-pencils bin/solr restart -port 8983 bin/solr restart -port 7574 |
You will then need to re-create the collection, and re-index the data.
Stopping and Restarting the Solr Panl Tutorial Process
- Stop all running Solr instances
See the 'Stopping Solr' section below, make sure that you stop all instances, whether it is for this process, or any other pre-existing installations that you may have - Create separate Solr and Panl installations
Re-download the installation files if necessary and unzip/un-tgz to a new, clean installation directory - Re-run the Getting Started Tutorial, ensuring that you are using the correct values for
SOLR_INSTALL_DIRECTORY, and
PANL_INSTALL_DIRECTORY
Stopping Solr
Windows:
|
Command(s) |
|
cd SOLR_INSTALL_DIRECTORY
bin\solr.cmd stop --all |
*NIX:
|
Command(s) |
|
cd SOLR_INSTALL_DIRECTORY
bin/solr stop --all |
This will stop all instances of the Solr servers that are running in cloud mode.
|
|
IMPORTANT: If you have multiple Solr installations, you will need to make sure that you run the stop command from the Solr installation directory that it was started from. |
Re-Starting Solr
Windows:
|
Command(s) |
|
cd SOLR_INSTALL_DIRECTORY
bin\solr.cmd start -cloud -p 8983 -s "example\cloud\node1\solr" bin\solr.cmd start -cloud -p 7574 -s "example\cloud\node2\solr" -z localhost:9983 |
*NIX:
|
Command(s) |
|
cd SOLR_INSTALL_DIRECTORY
bin/solr start -cloud -p 8983 -s "example/cloud/node1/solr" bin/solr start -cloud -p 7574 -s "example/cloud/node2/solr" -z localhost:9983 |
Worst-case Scenario
If nothing else seems to work, delete the Solr collection.
- Ensure that Solr is stopped,
- Delete the SOLR_INSTALL_DIRECTORY/example/cloud/node1, and
SOLR_INSTALL_DIRECTORY/example/cloud/node2 directories (including all of their contents[19] - see the footnote for the commands, but be careful copying and pasting), - Re-create the Solr cloud instance,
- Re-create the collection(s), and
- Re-index the data
When Things go Horribly-Wrong
Sometimes things just go wrong from day to day, unlike the previous troubleshooting section which only re-downloaded the packages and deleted or altered Solr collections, this section changes the start-up scripts for the Solr server from the defaults. Consequently, for a persistent issue, this will need to be done for any new installations.
|
|
IMPORTANT: This goes into far greater detail than should be necessary for most usages. Assuming that the previous sections have been smooth sailing, this section should hopefully not be needed, however... when at a loose end of a particularly curly problem, this section may offer help. |
Things That May Impact any Deployment
Operating systems are incredibly complex with background updates occurring to the operating systems, apps, and JDKs, all of which can interfere with the running of Solr and Panl - e.g.:
- Operating System updates
- Anti-Virus components
- Firewalls
- JDKs
- Versions of Solr and Panl
As an example, one day, the Solr server refused to start - the log file showed the following exception and first line of the stacktrace (timestamps have been removed for readability):
ERROR (main) [c: s: r: x: t:] o.a.s.s.CoreContainerProvider Could not start Solr. Check solr/home property and the logs => org.apache.solr.common.SolrException: java.util.concurrent.TimeoutException: Could not connect to ZooKeeper 127.0.0.1:9983 within 15000 ms
at org.apache.solr.common.cloud.SolrZkClient.<init>(SolrZkClient.java:223)
With any timeout, the general problem points to either a firewall issue (which is unlikely when all services are running on localhost), or that the timeout value was not long enough.
Things That Were Tried
- Re-downloaded Solr,
- Re-downloaded JDK,
- Tested various versions of the JDK,
- 11
- 13
- 17
- 21
- 23
- Turned off firewalls and anti-virus, and
- Created a new profile and tested with the above
After trying all of the above in various combinations, it was time to start digging deeper into the Solr configuration.
Running the Solr Server in Foreground Mode
Running the Solr server in foreground mode allows the logs to be printed to the console, rather than having a separate console to tail the logs. To run the Solr server in foreground mode, use the -f flag:
|
Command(s) - *NIX |
|
cd SOLR_INSTALL_DIRECTORY
bin/solr start -f -e cloud --no-prompt |
|
Command(s) - Windows |
|
cd SOLR_INSTALL_DIRECTORY
bin\solr start -f -e cloud --no-prompt |
You will be able to see the logs streaming through to the console. For even more information, use the --verbose flag:
|
Command(s) - *NIX |
|
cd SOLR_INSTALL_DIRECTORY
bin/solr start -f --verbose -e cloud --no-prompt |
|
Command(s) - Windows |
|
cd SOLR_INSTALL_DIRECTORY
bin\solr start -f --verbose -e cloud --no-prompt |
At the point in which the command failed, the error:
Could not connect to ZooKeeper 127.0.0.1:9983 within 15000 ms
Was displayed in the logs, time to start digging deeper
The solr.in.* Files
Within the bin directory which contains the startup scripts, there are additional files that can help to set properties that configure various aspects of the Solr server - solr.in.sh for *NIX based systems and solr.in.cmd for Windows based systems. By default, both of these files have no effect (all lines are commented out), but are well commented to help you understand what each of the configuration options do.
A comment in the file notes:
Settings here will override settings in existing env vars or in bin/solr. The default shipped state of this file is completely commented.
Among the properties that can be set - Note: these will overwrite any previously set properties/environment variables:
- SOLR_JAVA_HOME - the Java home to use for Solr
- SOLR_JAVA_MEM - Java memory options
- GC_TUNE - Garbage collection tuning
- SOLR_DATA_HOME - Where to place the Solr Data files
- LOG4J_PROPS - Where the log4j2.xml file resides
- SOLR_SSL_* - SSL/TLS options
- ZK_* - Zookeeper options
- SOLR_OPTS - Solr command line options
One of the most important options to set is the SOLR_OPTS key. For Windows based systems use the line:
set SOLR_OPTS=%SOLR_OPTS% -D<key>=<value>
Or for *NIX systems, use the line:
SOLR_OPTS="$SOLR_OPTS -D<key>=<value>"
Where:
- <key> is the property key, and
- <value> is the property value
Debugging the Timeout Error
After looking through various bits of documentation and websites (including downloading and inspecting the code for Solr) - The zkConnectTimeout is the value that is required to be configured to override the default 15000ms. These values were the first thing tested to attempt to resolve the error.
SOLR_OPTS="$SOLR_OPTS% -DSOLR_ZOOKEEPER_CONNECT_TIMEOUT_MS=120000"
SOLR_OPTS="$SOLR_OPTS% -DSOLR_CONNECT_TIMEOUT_MS=120000"
SOLR_OPTS="$SOLR_OPTS% -DzkConnectTimeout=120000"
Or for Windows based systems:
set SOLR_OPTS=%SOLR_OPTS% -DSOLR_ZOOKEEPER_CONNECT_TIMEOUT_MS=120000
set SOLR_OPTS=%SOLR_OPTS% -DSOLR_CONNECT_TIMEOUT_MS=120000
set SOLR_OPTS=%SOLR_OPTS% -DzkConnectTimeout=120000
The logging now outputs
INFO (main) [c: s: r: x: t:] o.a.s.c.c.ConnectionManager Waiting up to 120000ms for client to connect to ZooKeeper
Which is the desired value. The Solr server now starts up correctly, and the debugging detour is over. Of note, the timestamps below show that it took over 36 seconds for the Solr Zookeeper connection to be performed.
05:10:12.236 INFO o.a.s.c.c.ConnectionManager Waiting up to 120000ms for client to connect to ZooKeeper
05:10:48.541 INFO o.a.s.c.c.ConnectionManager zkClient has connected
A further warning showed
WARN (main) [c: s: r: x: t:] o.a.s.h.a.SystemInfoHandler Resolving canonical hostname for local host took 36.284 seconds, possible DNS misconfiguration. Set the 'solr.dns.prevent.reverse.lookup' sysprop to true on startup to prevent future lookups if DNS can not be fixed.
So additional configuration was done for the SOLR_OPTS key and defined with -Dsolr.dns.prevent.reverse.lookup=true property.
The Solr servers now start up correctly.
All values for changed properties should be tested on your production environment to ensure that they are correct.
Next Steps
- For indexing additional data, see the Additional Data chapter, for a deeper understanding of how to set up a new collection and index data.
- Read the Solr Fundamentals and Panl Fundamentals sections for base information.
- Work through setting up a search page from scratch with The Bookstore Walkthrough chapter.
- Test out DATE RANGE facets, see the section on indexing the Simple Date dataset.
- Understand how to programmatically index a collection with the Filesystem Indexing And Searching Walkthrough chapter.
~ ~ ~ * ~ ~ ~